https://developers.google.com/apps-script/articles/embedding_docslist_in_sites
Overview
In this tutorial, we develop our script using the Script Editor in Sites. Further, we use a time-driven trigger to automatically trigger this script.
Section 1: Embedding folders in a File Cabinet
Linking Google Docs Folders with Sites File Cabinet
- Open the Script Editor in your Site.
- Click More Actions > Manage Site.
- In the left-hand sidebar, click Apps Scripts.
- Click Launch Editor.
- Copy and paste the following code into the editor.
  function showFolderInSite() {
    var files = DocsList.getFolderById("PASTE_FOLDER_ID_HERE").getFiles();
    var page = SitesApp.getPageByUrl("PASTE_PAGE_URL_HERE");
    for(i in files){
       page.addWebAttachment(files[i].getName(), '', files[i].getUrl());
    }
} - Open your folder in Google Docs and copy the folder ID from the URL that is in the browser window. The folder ID is everything after the
folder.#.portion of the URL.
For example, given the following example urlhttps://docs.google.com/?tab=mo&authuser=0#folders/folder.0.0B3xR7WfXrj7aOGY4Y2M3OWItZjAyYy00ZTM5LTg3MTgtNjNkYWZhZTZmYmU3the folder ID is this section:0B3xR7WfXrj7aOGY4Y2M3OWItZjAyYy00ZTM5LTg3MTgtNjNkYWZhZTZmYmU3. Note that it is everything after thefolder.0.The following graphic also shows the folder ID:

- Paste the folder ID into the
PASTE_FOLDER_ID_HEREsection of the code sample above.Note: You might prefer to use a path instead of the folder ID to open your folder with Google Apps Script. If using the path, use the
getFolder()method instead ofgetFolderByID(). This method takes a path that you construct from the folder hierarchy as seen in your Document List.
To construct the path from your Document List hierarchy, add forward-slashes between the folder names. For example, the path to folder 2009, sub-folder of the Accounts folder might look like this:var files = DocsList.getFolder("Accounts/2009").getFiles();Note: The method
getFiles()from class Folder returns an array containing all files in the folder. We can read this array with a loop, one file at a time. The JavaScript "for" loop is very useful each time an Apps Script method return an array of results. In this loop, we can use several methods from the classgetFiles()from class File to access the information we need, such as the name and URL of each file. - Replace
PASTE_PAGE_URL_HEREin the methodgetPageByUrl()by the url of your file cabinet.Note: Method
addWebAttachment()needs 3 parameters: title, description and url. In our case, the description field is left blank. - Click the Save icon.
- Give the script a name and click Save.
- Click the Run icon. A pop-up opens asking your authorization to access the Google Docs list and Google Sites services.
- Click the Authorize button.
- Click the Run icon again.
You should see links to your Google Docs files in your file cabinet.
Using Triggers to get an Up-to-date List
The content of your Google Docs folder will change over time. You will certainly add, rename and remove files in this folder. A time-driven trigger can help to keep the file cabinet up-to-date. The function showFolderInSite can be automatically triggered every day, or even every minute.
Security Consideration: Time-driven triggers, like the other installable Event Handlers, run under your identity (ie the identity of the person who installed the trigger). When you install such a trigger, you give it authorization to access the Google Docs List and Google Sites services under your identity.
To install a trigger:
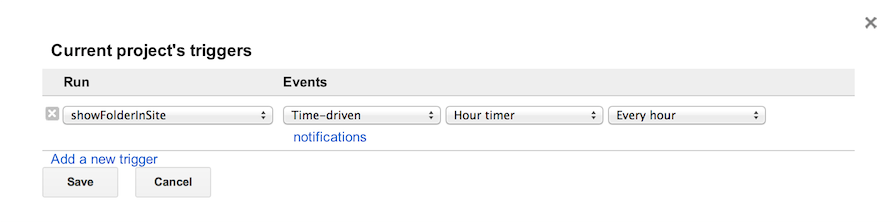
- In the script editor, open the Resources menu and click on Current script's triggers... The Current Script's triggers dialog opens.
- Click on the link saying No triggers set up. Click here to add one now. A dialog asking you to set up triggers opens.
- Ensure that the function
showFolderInSiteand the event Time-driven are selected. - Select the appropriate time depending on your needs. The script can be automatically triggered every minute, hour, day,...
- Click the Save button.
Each time the function showFolderInSite is triggered, it adds all files, even if they have been added already. In order to avoid duplicates, add the following snippet of code to the script, before the loop for(i in files) .
  var attachments = page.getAttachments();
  for(i in attachments){
   attachments[i].deleteAttachment();
  }
Section 2: Using a List Page to Show the Folder
For various reasons, you might prefer to use a list page instead of a file cabinet to embed your folder, especially if you have many files in your folder and want to sort them in your page or if you want to show more information on each file, like the owner, type, size and last time it has been edited.
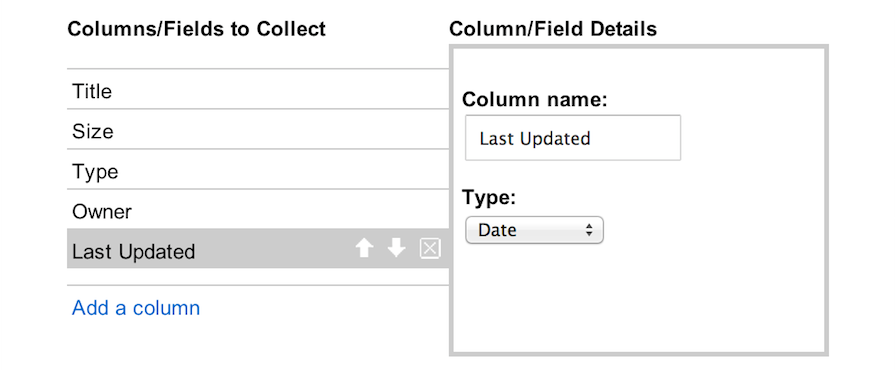
- Create a list page and click on the "Create a custom list" button
- Name the first column "Title" and choose the URL type.
- Name the first column "Title" and choose the URL type.
- Add columns "Type", "Size" and "Owner" and use the default type: Text
- Add column "Last Updated" and use the Date type
- In the script editor, click on menu File > New and paste the following code into the editor.
- Replace
PASTE_FOLDER_ID_HEREandPASTE_PAGE_URL_HEREby the folder Id and the url of your list page. - Save and run the script.
  function showFolderInSite() {
    var files = DocsList.getFolderById("PASTE_FOLDER_ID_HERE").getFiles();
    var page = SitesApp.getPageByUrl("PASTE_PAGE_URL_HERE");
    var listItems = page.getListItems();
    for(i in listItems){
       listItems[i].deleteListItem();
    }
    for(i in files){
       var title = "<a href=\""+files[i].getUrl()+"\">"+ files[i].getName() +"</a>";
       // Add data according to the order of columns in your list
       page.addListItem([title, files[i].getType(), files[i].getSize(), files[i].getOwner(), files[i].getLastUpdated()]);
   }
  }
Note: The method addListItem() from class Page needs an array [] as parameter. The first value in this array is added to the first column of the list (here a link to the file is added to the column "Title"). Then the second value is added in the second column ("Type"), and so on.
Note: In order to use the "URL" type in a list page, we need to recreate an HTML anchor:var title = "<a href=\""+files[i].getUrl()+"\">"+ files[i].getName() +"</a>";
Here's the result.
There is still room for improvement. First, the links are correctly shown in the first column("Title"), but in the second column, "Type", the text "blob_item" is shown whenever the file is not a standard Google Docs file (not a Spreadsheet, a Document, or Presentation). In order to address this, let's replace this text based on the extension of each file: pdf, ppt, etc.
In the third field, "Size", a zero is shown for every standard Google Docs file. This is not useful, so let's remove it. Additionally, let's convert all the other numerical sizes to more useful formats. For example "28099" becomes 28kb".
Next, there is the "Owner" field. Let's replace the email address ("romain.vialard@gmail.com") with a name ("Romain Vialard").
Finally, our first and last column suffer an issue: when you don't use the standard Type (Type Text) for a column, you need to use a specific format. For the first column, we used an HTML anchor, for the last one we will use a specific date format.
At the end, our List Page looks like this:

Here's the final code with some comments that explain the important parts of the code including areas you can customize to fit your needs:
Note:You'll not find methods .substring() & .lastIndexOf() in the Apps Script documentation. Those are common JavaScript methods from the String Object. More information here: lastIndexOf() - substring().
  function showFolderInSite() {
   var done = false;
   while(!done){
   // The while loop and try - catch statement are used to automatically retry if there's an issue during the execution (common issue: SitesApp: Internal error).
    try{
      var files = DocsList.getFolderById("PASTE_FOLDER_ID_HERE").getFiles();
       var page = SitesApp.getPageByUrl("PASTE_PAGE_URL_HERE");
       var listItems = page.getListItems();
       for(i in listItems){
         listItems[i].deleteListItem();
       }
       for(i in files){
       /*** Title field ***/
    var title = "<a href=\""+files[i].getUrl()+"\">"+ files[i].getName() +"</a>";
       /*** Type field ***/
         var type = files[i].getType();
       // condition: if the type is "blob_item" replace it by the filename extension
         if(type == "blob_item"){
           type = files[i].getName().substring(files[i].getName().lastIndexOf('.'));
         }
       /*** Size field ***/
       // To indicate the size properly, we need multiple conditions:
       // - If size > 0, we show the size, else (if size = 0) it's a Google Docs file and we can hide this zero.
       // - Calculate the length of the number (28099 is five digits, 2158080 is seven digits):
       // If length < 7 digits then size is < 1mb. Indicate "kb" and remove the last digits (the bytes).
       // Else, indicate "mb" and remove the last digits (kilobytes and bytes).
         var size = files[i].getSize();
         if(size > 0){
           var length = size.toString().length;
           if(length < 7){
             size = size.toString().substring(0,length - 3) + "kb";
           }
           else{
             size = size.toString().substring(0,length - 6) + "mb";
         }
       }
       else{
          size = '';
       }
       /*** Owner field ***/
      // Take the email address and remove everything after the @.
        var owner = files[i].getOwner().toString().substring(0,files[i].getOwner().toString().indexOf('@'));
       /*** Last Updated field ***/
       // .formatDate() is a method from the Utilities Services
              var lastUpdated = Utilities.formatDate(files[i].getLastUpdated(), "GMT", "yyyy-MM-dd");
       /******/
        // Add data according to the order of columns in your list
        page.addListItem([title, type, size, owner, lastUpdated]);
       }
      done = true;
      }
       catch(e){
       }
   }
  }
Summary
Congratulations, you have learned how to embed a Google Docs folder in a Google Site. If you want to link several folders to several list pages, find the script "Embed Google Docs Folders in a Google Site" in the spreadsheet gallery.
Комментариев нет:
Отправить комментарий